Recording Tips
When shooting videos for ActionStitch, keep these details in mind:
- Use the same settings on both cameras, especially exposure and white balance. Different cameras can be used, but ActionStitch doesn't adjust colors during stitching, so there may be a visible seam caused by differences in exposure and white balance.
- Turn off image stabilization (HyperSmooth, RockSteady, etc.). Since cameras are mounted on a tripod, stabilization is unnecessary and makes stitching impossible.
- Disable distortion correction. Some cameras offer built-in fisheye correction, but this drains the battery faster and reduces the effective field of view. ActionStitch handles distortion correction during the stitching stage.
- Pay attention to metering mode. The default mode uses the entire frame, which can cause exposure imbalance when the sun is on one side. Use Spot or Center mode for more consistent exposure. Some cameras let you pick a custom metering area — select the same spot of the field from both cameras.
Don't have videos yet? Download these sample videos recorded by GoPro Hero Black 10 to follow along: left camera and right camera.
Step 1: Sync
This screenshot summarizes the steps to sync left and right videos in ActionStitch:
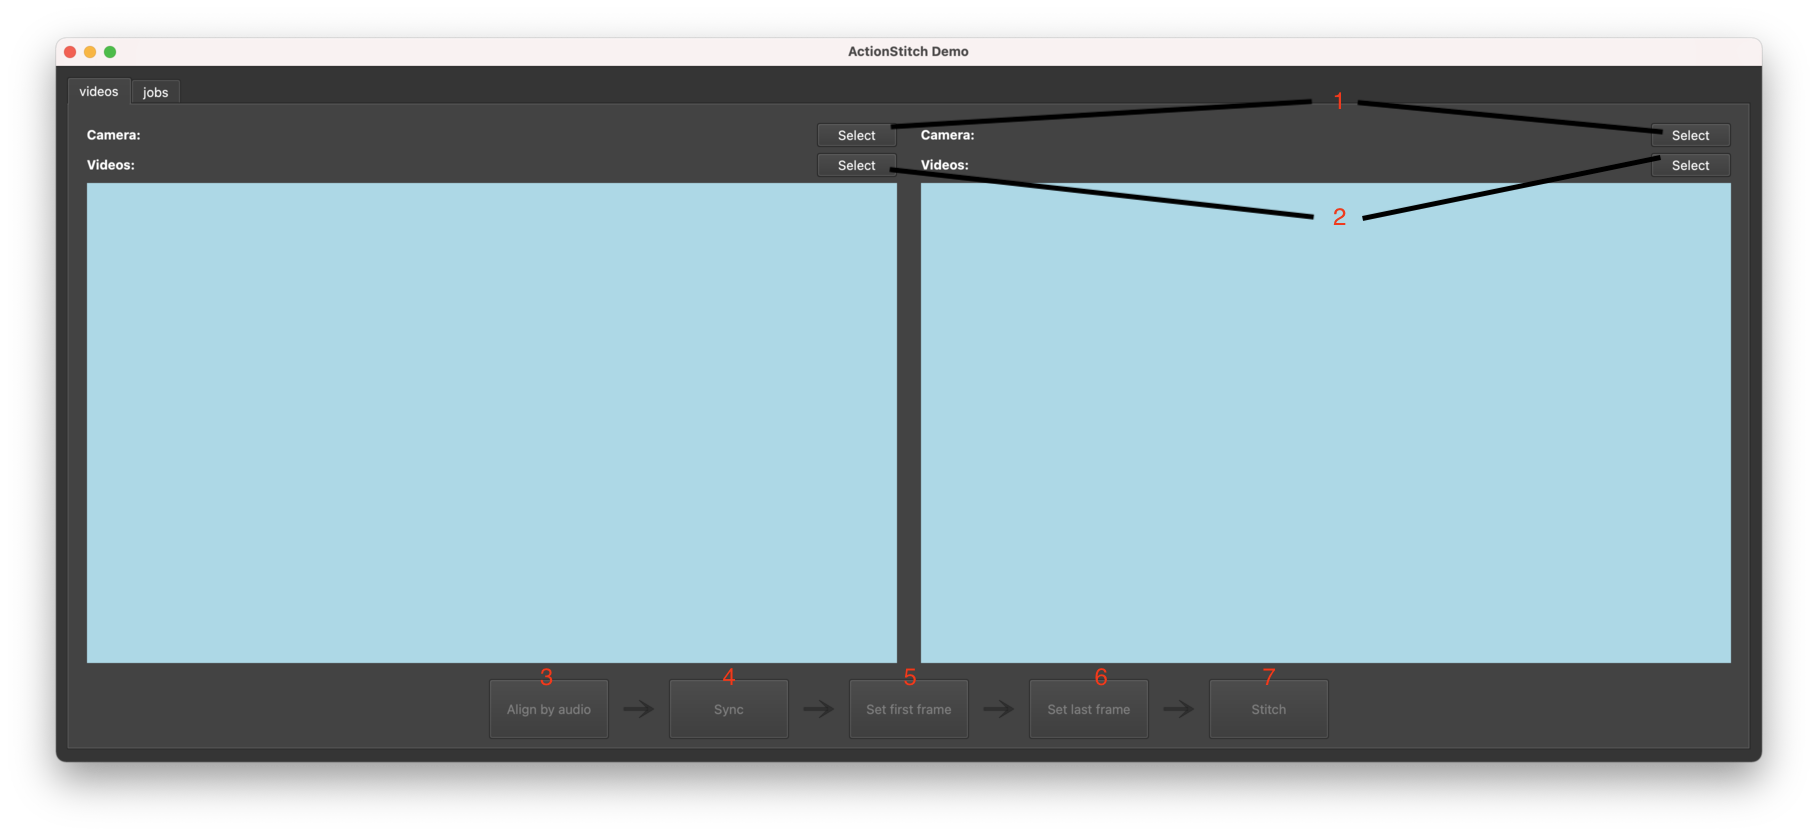
- Select camera models — choose the camera model from the list of supported cameras. Videos from different cameras can be stitched, as long as the resolution and fps match. The video resolution must match what is indicated for the selected camera.
- Select video files — select videos from left and right cameras. You can select multiple files at once; there's no need to combine them into one big file first.
- Align by audio — this process automatically aligns left and right video frames by comparing their audio waves. It usually works as long as both recordings were started less than 10 seconds apart.
- Sync — click this button to lock the frame difference in both video players. A single video control bar will control both videos. Seek to a point where the ball is moving fast across the midfield line to verify the sync is correct.
- Set first frame — set the current frame as the starting point of the stitched video. You can also drag the left end of the blue bar in the video control.
- Set last frame — set where the stitched video ends. Drag the right end of the blue bar in the video control.
- Stitch — proceed to set stitching options. ActionStitch will use the current scene to calculate the parameters needed to stitch both videos.
If the ball in the synced scene is too far away to see, you can use the mouse wheel to zoom in:
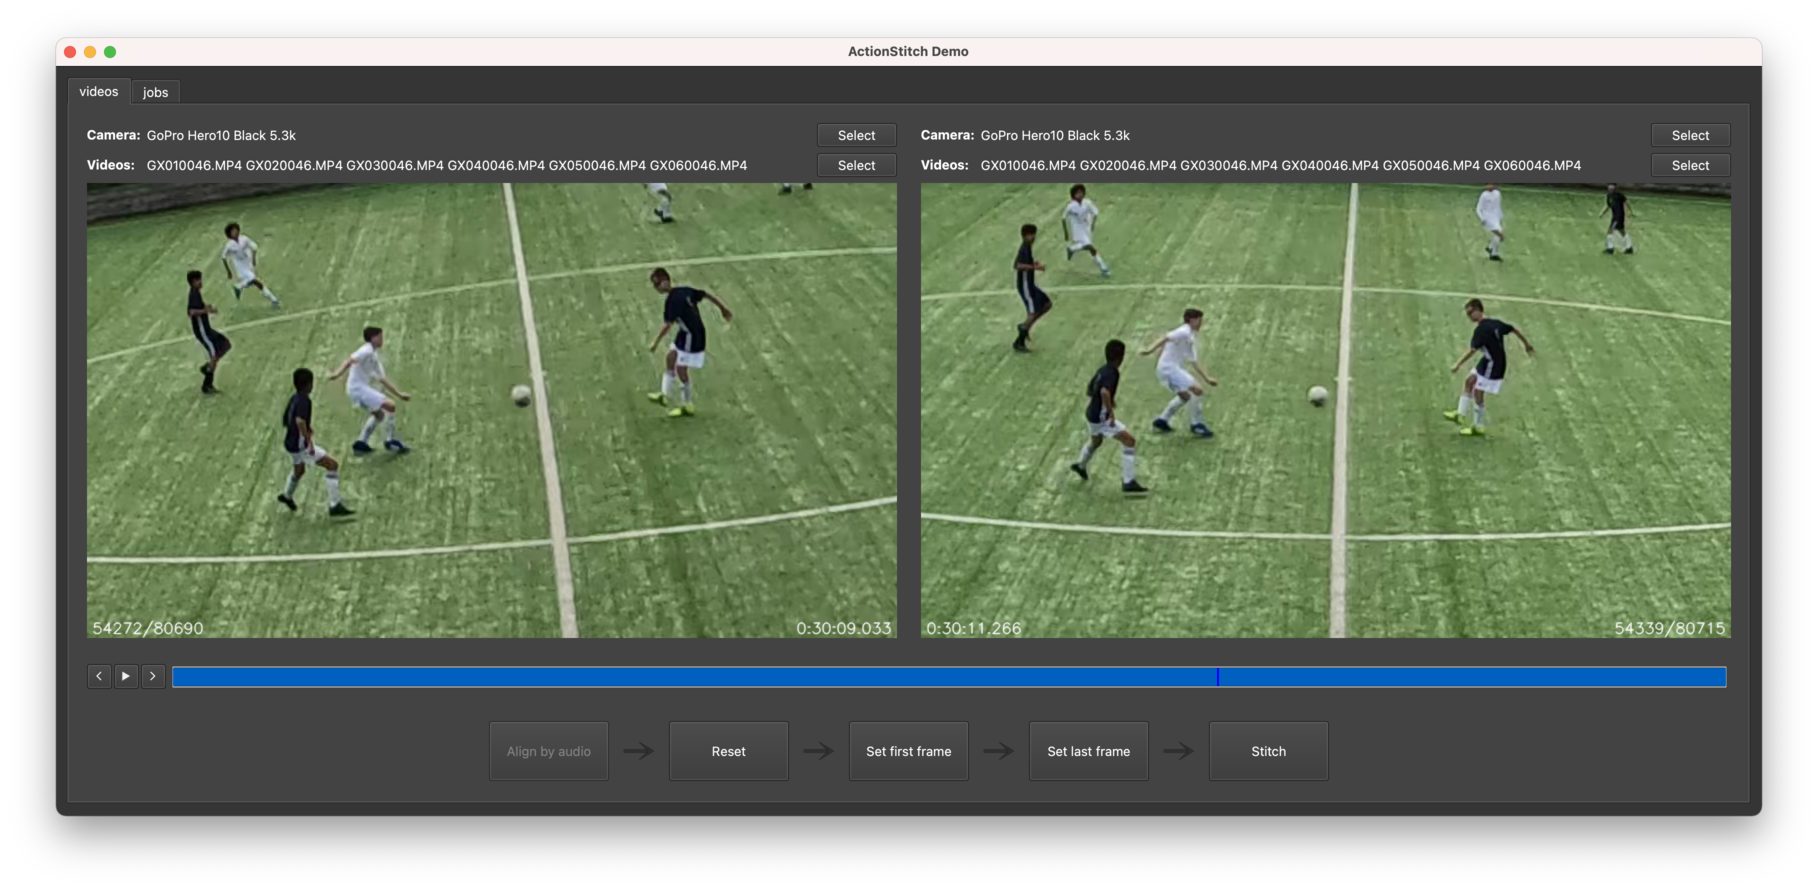
Notice that the ball position is slightly different in both frames — this is normal because the two cameras shoot independently without hardware synchronization. In practice, this difference is hardly noticeable in the final stitched video.
Tip: If audio alignment fails, you can sync manually. Seek to a scene with visible motion and use the step forward/backward buttons to match frames. Good sync points include the midfield line, a moving player, a background object, or a moment when a high ball bounces off the ground.
Step 2: Stitch
After clicking the Stitch button, this dialog will appear:
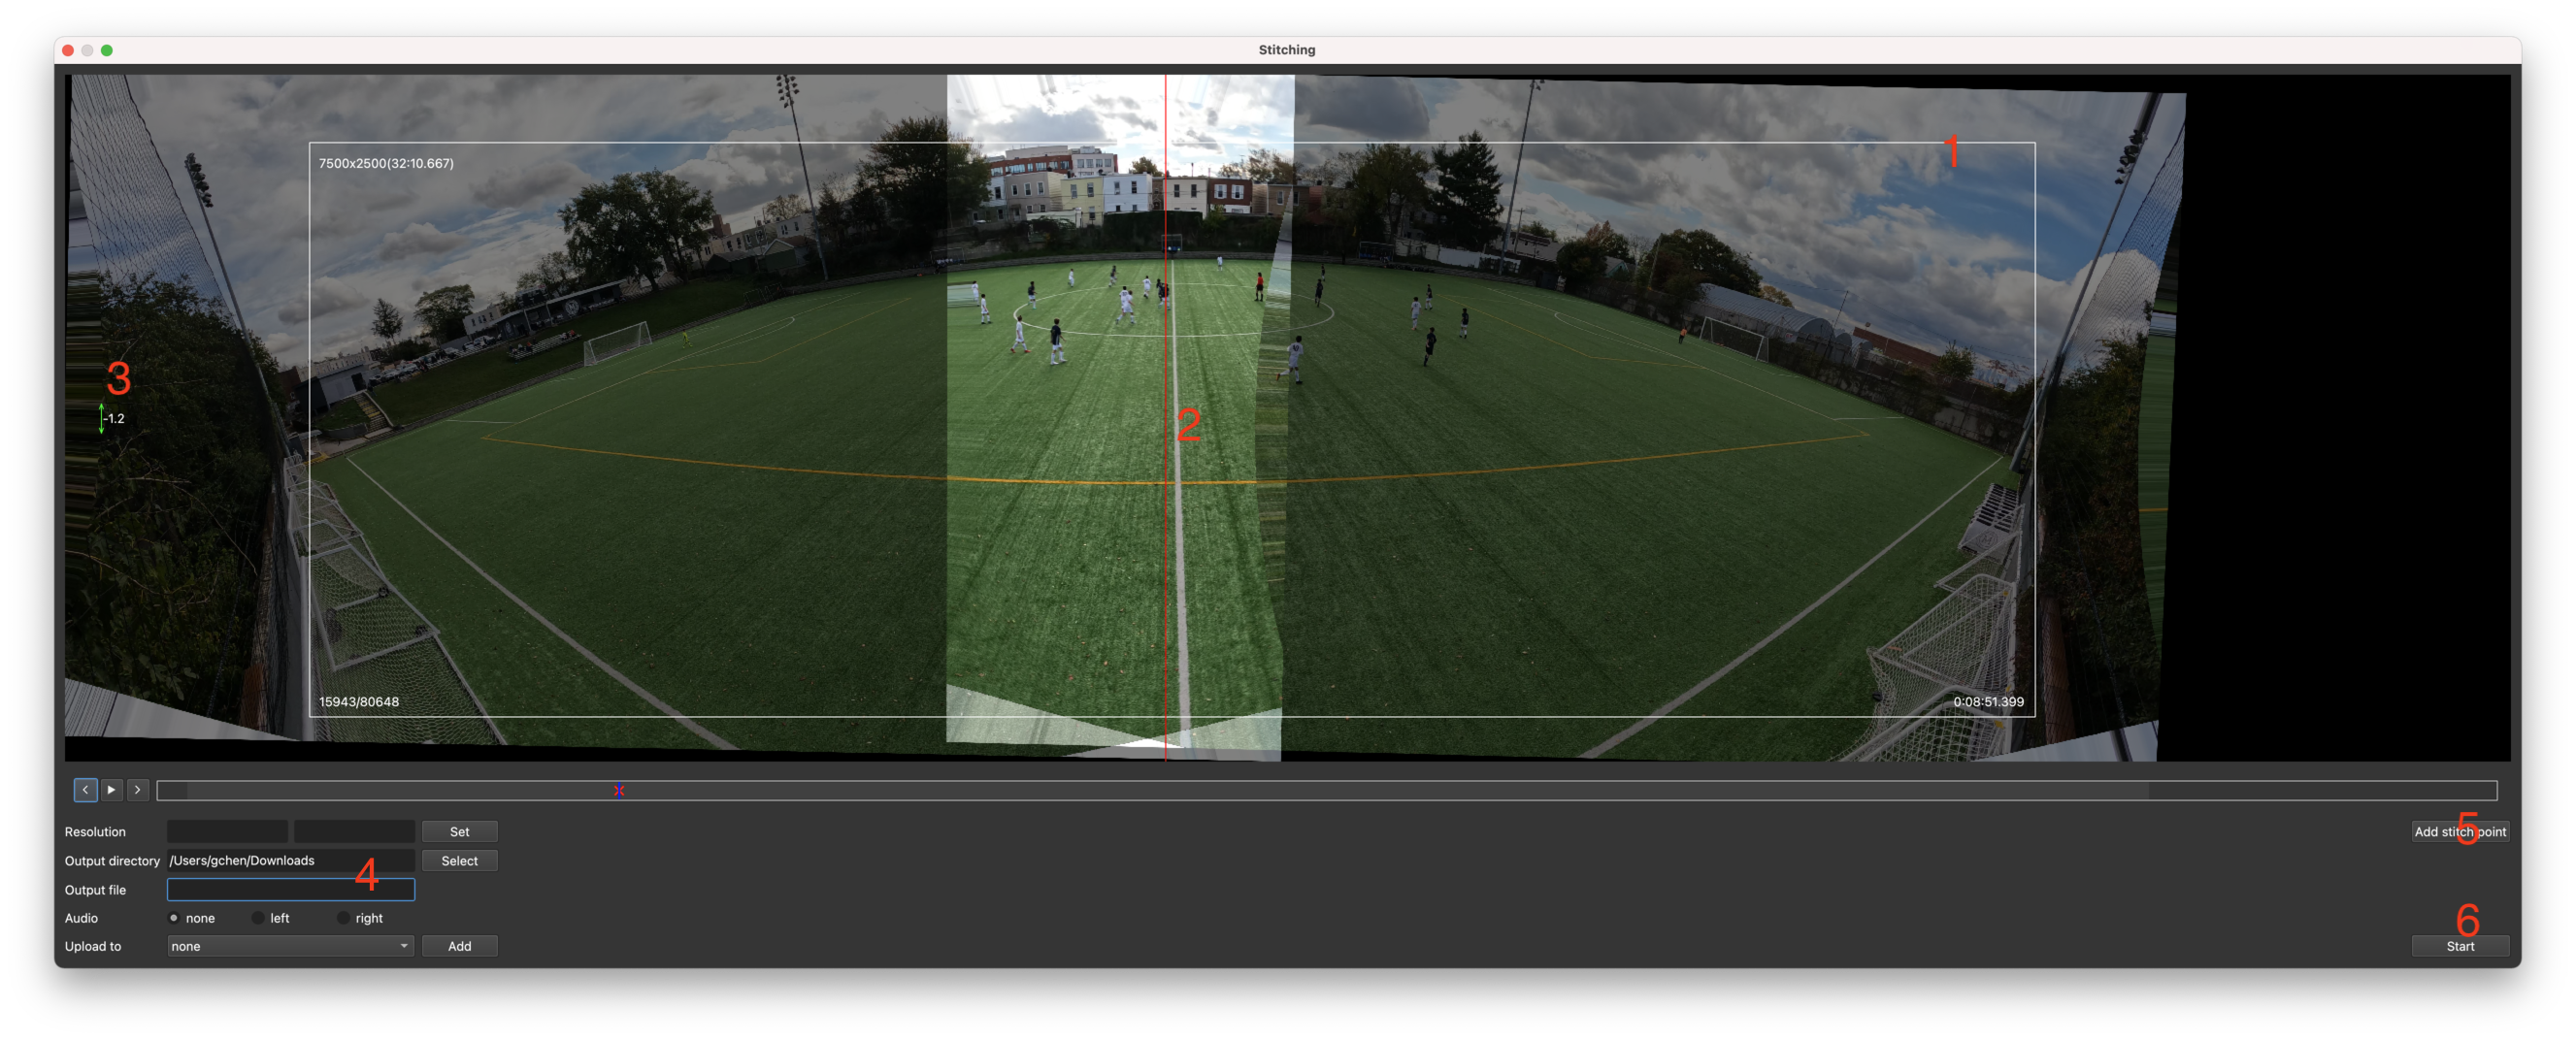
You can see how left and right videos are lined up almost perfectly in the middle — this indicates good stitching quality. If players or lines don't line up, it usually means a wrong camera model was selected, causing incorrect calibration data to be used.
Follow these steps to create the stitch job:
- Set the video outline — the white rectangle box defines which part of the scene goes into the stitched video. This box can be moved but not resized. Change the width and height using the resolution text inputs below the video.
- Set the divider — the red vertical line determines which part comes from the left video and which from the right. Place it close to the midfield line and avoid noisy areas from either video.
- Level the scene — useful when cameras aren't perfectly level. Move the outline box down temporarily and use it as a reference to check if two close corners of the field are at the same height. Hold the green up-and-down arrows and move the mouse to level.
- Choose the video file name — set the directory and file name for the stitched video.
- Add stitch points (optional) — the red cross in the video control bar is the current stitch point. If cameras didn't move during the game, one stitch point is enough. If cameras moved or were hit by a ball, add new stitch points. Verify stitching quality by moving the blue handle.
- Create the stitch job — start processing the stitched video.
Cloud upload: You can upload the stitched video to an online storage service via S3 protocol (Amazon S3, Wasabi), or to Dropbox, OneDrive, or Google Drive.
Step 3: Play
You can play the stitched video using any video player or in a browser like Chrome. However, due to the high resolution some players may struggle, and none of them can zoom in while playing.
For this reason we developed our own in-browser player. Make the video publicly accessible and append the link to this URL:
For example, our demo video can be opened with:
With our player you can:
- Zoom in and out — use the mouse wheel to zoom, or drag to move the viewing area.
- Record highlights — click the record button to activate record mode and crop the video into highlights.
- Interactive perspective mode — view the game without any distortion, as if watching from a freely rotating camera. Toggle this with the mode switching button on the control bar. Requires the latest version of Chrome and a decent GPU.
Tip: Click the question mark button in the bottom left corner of the player for on-screen instructions.